The best thing about Zbrush is the freedom it gives to simply sculpt and get some really clean detailed models. The problem you will quickly run into is when you export the model and are floored but a crazy file size of upwards of a GB.
The file size of Zbrush models has a direct correlation with the amount of polygons the model has. The more polygons there are the larger the file. This can be reduced by using tactics like retopology and texture maps such as normal & displacement maps.
While it may be easy to say to reduce your poly count in practice this can actually be somewhat of a complex task.
What Causes Large Files
As I have already mentioned the number of polys dictates the file size.
Polys also referred to as polygons are the triangles that make up the model. The more triangles you use typically allows you to add more detail or smooth models.
With Zbrush it is surprisingly easy to get carried away with tools such as Dynamesh, Subdividing and my personal favourite Sculptris. It is amazing how quickly the poly count can skyrocket.
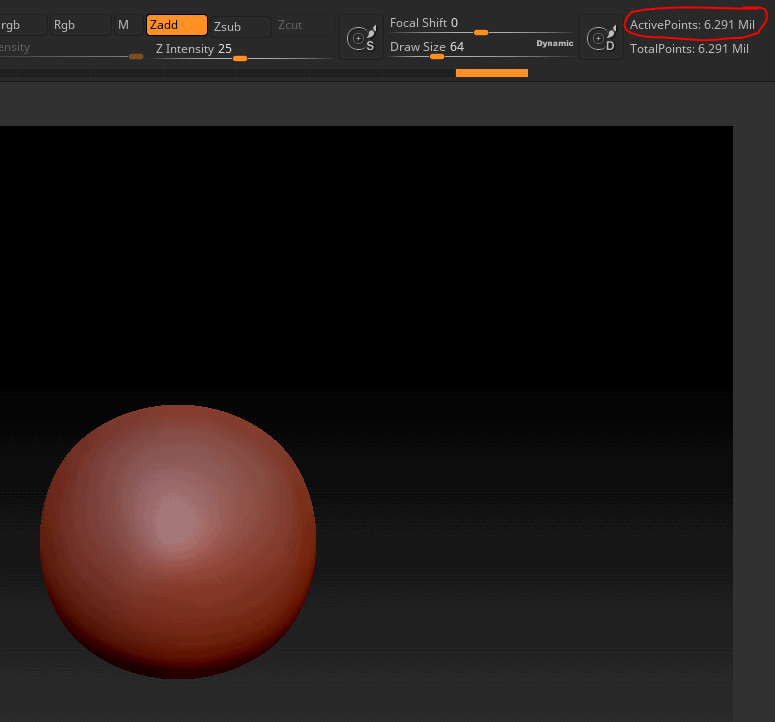
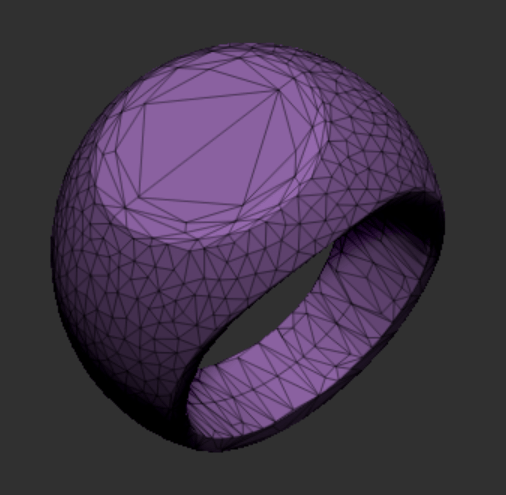
To give some context the below sphere has approximately 6 million polys. When I export this to OBJ the file size is 426 Mb!!! I used OBJ as it generally only stores the model and no additional info that other file types do such as FBX.
If I go ahead and retopologize this model using the really simple Zbrush plugin Decimation Master I can get it 20k polys. The file size has now reduced to a small 1.4Mb this is a HUGE reduction with no difference in the appearance of the sphere.
For no other reason other than I’m a nerd when it comes to stats I wanted to satisfy my curiosity and find out if it is a linear relationship between poly count and file size. Or was there possibly something else at play. So I run the same scenario but tried exporting my model at various poly counts and below is what I found.
| Poly Count | File Size MB |
| 6,000 | 0.34 |
| 24,000 | 1.43 |
| 98,000 | 5.91 |
| 393,000 | 24.95 |
| 1,572,000 | 103.39 |
| 6,291,000 | 426.66 |
| 12,999,000 | 824.64 |
| 21,119,000 | 1,485.87 |
| 25,165,000 | 1,779.10 |
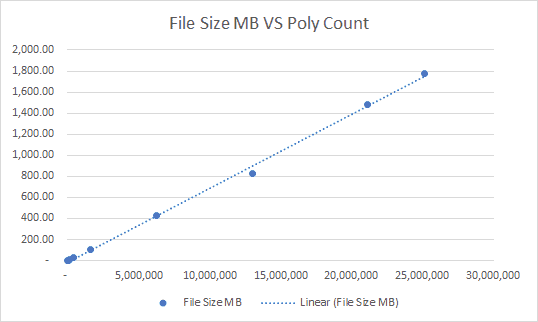
To no surprise I found a very clear indication that the file size is directly related poly count.
Why Reduce your File Size
While its not always essential to reduce your poly count there are some considerable advantages to doing so. Such advantages include.
- Reducing disk space usage
- Using the large models in other programs may dramatically reduce the program’s performance
- Smaller models are ideal for real time rendering such as game engines or Blenders Eevee.
- Can take a long time to load and export in modelling pipelines
- Can considerably increase render times.
- Makes it difficult to upload and download models online.
A lot of these disadvantages of course implies that you are going to use other programs than Zbrush. If your only goal is to model and render within Zbrush, then file size in my opinion is unimportant and you may be wasting your time.
How Reduce Your File Size
There are some really easy ways to reduce file size and there are some more time consuming ones.
Which you use is really up to you and it comes down to the purpose behind what you are trying to achieve with your model.
My time is extremely limited, balancing a full time job and a family so I always look for the quickest way to get a desired result.
The easiest way to reduce file size is through Retopology, Texture Maps or a mixture of both, as such lets discuss what these are and how to do them.
Retopology
Retoplogy is simply a process you can take that can redistribute the polygons of your model in a way that is more practical. This helps in a vaiety of ways including while modelling, texturing, animating or in this case reducing file size.
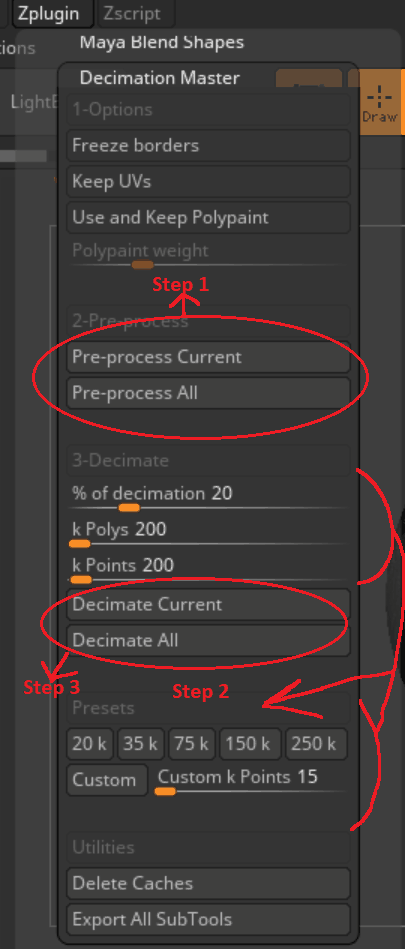
There is more than one way to achieve this in Zbrush and it is not as daunting as it seems. Here I will cover a function called Decimation Master. Its not necessarily the best method depending on the purpose of the model but it is the easiest to get results. For other methods please check out my article 5 Ways to Retopologize in Zbrush.
First you select the tool you want to retopologize. Then in the menu up the top select the Zplugin Tab then Decimation Master.
After that simply hit Pre-Process for the tool you select or you can do it to all tools. Then select your poly count from any of the options and hit Decimate.
After you have done this you should get a mesh similar to the one below. Its not an elegant solution but it does the job and keeps the shape really well.
Normal or Displacement Maps
Normal Maps and Displacement Maps are textures you can apply to your model that basically trick the render engine to perceive the model as having more detail than it does. This is done by manipulating how light interacts with the model.
To do this is a little more technical than retopology and commonly requires you to retoplologize as well. However because you are relying on texture maps as well you can reduce poly count further than just relying on retopology. While this is more work you can typically be less picky about your mesh.
You can find out in depth how to create a Normal Map in this article I wrote, but below is a quick summary.
Create 2 versions of your model the High Poly and Low Poly. Usually the easiest way to do this in Zbrush is to use ZRemesher. Simply dictate your poly count and hit ZRemesh. Save both versions in separate files.
You will also need to ensure that your Low Poly has a UV setup as well. An easy way to do this is using UV Master, another Zplugin (please refer example below). You can find out more about this process here where I go through an example of doing this in Blender for a cleaner result.

Unfortunately at this stage you have to rely on external programs to create normal map. Blender is a great free option but if you want an easy to learn and quick option I recommend a free program called XNormal.
Regardless of the program you use you simply load the High Poly and the Low Poly Versions of the model and bake a texture similar to the below.

While it looks a little funky it gets really nice results and detail as per the below for example.
Almost all renderers allow you to use Normal Maps. When you take your model into a game engine or Blender for instance you will be able to apply your texture to the low poly version and get the result of a high poly model at significantly smaller file size.
Conclusion
Hopefully you have found this enlightening and you now know how to significantly reduce your files sizes. Zbrush is an exceptionally fun program to use but one of the biggest culprits of insanely large files. By simply retopologizing and using normal or displacement maps you can show Zbrush who’s boss.
Good luck and keep sculpting.