Zbrush has various retopology tools you can utilise. They range from completely automated tools to completely manual. Gaining an understanding of these and their limitations can help you make informed decisions that can greatly speed up your workflow.
These tools are not necessarily obvious in Zbrush so they are often overlooked in preference of using other programs for retopology. This can slow or stunt your workflow having to regularly change between programs.
Why do You Need to Retopologize
Retopology is the process of refining the wire frame of your 3d model so it is more manageable to use in a 3d modelling pipeline
In the process of sculpting and creating a 3d models particularly in Zbrush your poly count can easily blow out into the millions. While this is manageable in Zbrush other 3d programs will not be able to handle the increased load this puts on the system to be able to render this many polys.
Real time rendering for example in game engines cannot handle large poly counts, so it is essential to get the poly count as low as possible.
Retopology may not just be about reducing the poly count, by refining the wire frame it can assist with how your model deforms during animation. If you are curious please check out my article on this here.
Good topology can help with the UV process allowing for seams to be placed in ideal places and UV’s to be utilised to thier fullest to assist in the texturing process.
In short retopologizing is an extremely important part of the 3d modelling pipeline and ensuring this is done correctly can greatly improve your model and your workflow.
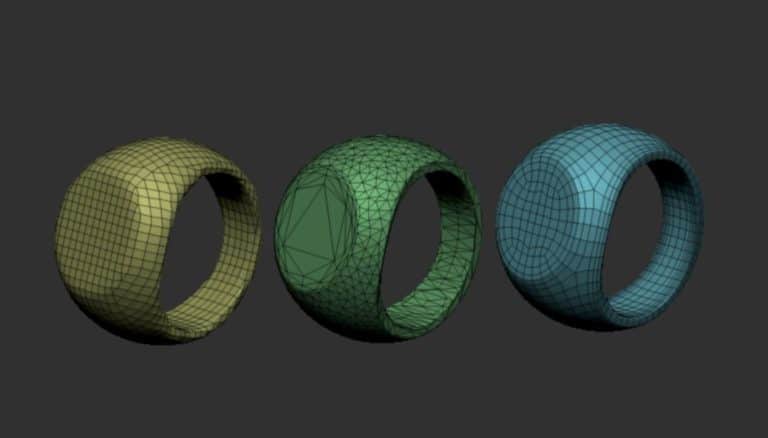
1. Dynamesh
Dynamesh is a useful retopology tool and it is 100% automatic, however it is in most cases not ideal for a final model.
Its biggest draw back is you have very little control how it retopologizes, however its uses are fantastic for the sculpting process.
Example of How to Use
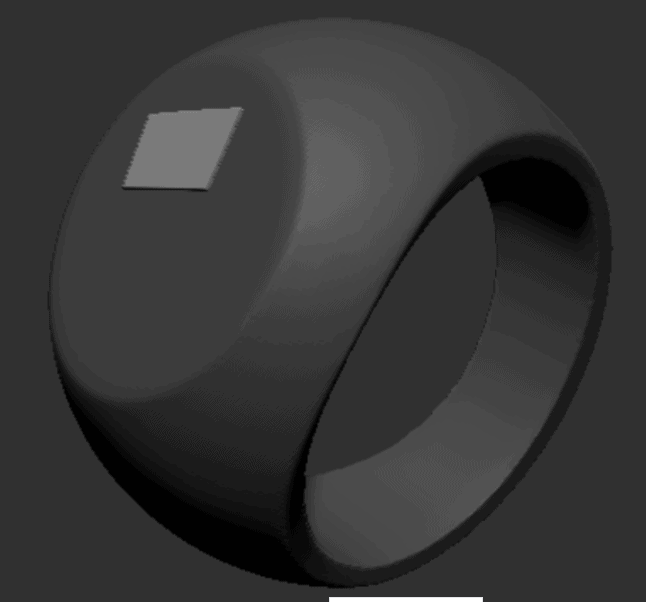
For this example we will use a ring that come stock standard with Zbrush that has 40k polys.
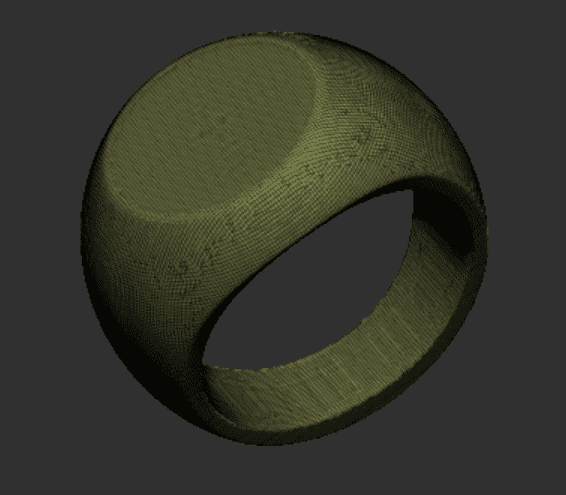
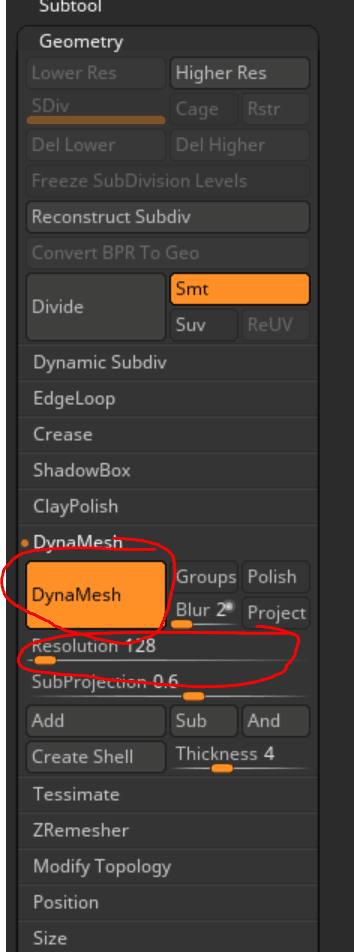
To use Dynamesh it is easy. In the menu on the right hand side select Geometry and navigate to the Dynamesh section. Once there it is as simple as selecting you desired resolution as per below.
You will notice nothing has happened to your mesh yet, this is because you need not now go into the drawing panel not on you mesh but to the side hold ctrl and drag (Who would have guessed right).
If you get no effect you just need to make a small change to your model so turn smooth intensity down for instance smooth and try again. If all goes well your model should reduced in polys as per the below.
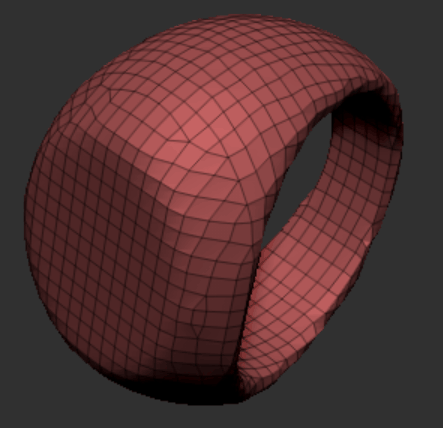
In this case it has help its shape pretty well and been reduced to 1.5k polys however you are not always this lucky.
Pros
- 100% automated
- Fast and easy to iterate
- Easy to use
- It merges any toplogy that is not connected eliminating unwanted polys
Cons
- No flexibility as to how to set out topology
- Algorithm is not optimal to be used as final topology
Best way to use this:
- If using to produce final topology play around with the different resolutions until you get the desired result.
- This function is best used for creating more topology or evening out the topology for better sculpting
- Use this tool to eliminate hidden topology and merge any points that arn’t connected.
2. ZRemesher
Zremesher is Zbrushes best attempt at an automated retopology tool.
There are various ways to use this tool and its worth trying them out. It allows such things as freezing borders, identifying edges and using poly paint to dictate poly density to name a few. You may be unaware that Zremesher actually has 3 different algorithms which it gives you access to.
In most part you could use Zremesher to create your final topology however this is very much dependent or what you are retopologizing.
Example of How to Use
Lets once again start with our 40k poly ring.
The Zremesher can be access through the geometry menu on the right. In this example I am going to set my target poly count to 0.5. As I mentioned there are 3 algorithms to use when Zremesheing the first 2 are obvious but the third is secret!!
The first is simply clicking the Zremesher button. The second clicking the Legacy 2018 button then the Zremesher Button. The third is holding alt when you press the ZRemesher button.

In the below example I have run all 3 algortyhtms so you can see their subtle differences.

Pros
- 100% automatic
- Can create great topology for some types of models
- Lots of control and different tools to help
Cons
- It isn’t perfect it can struggle with complex shapes
- The algorithm is slow for really high poly meshes
Best way to use this:
- Setting poly groups can help guide Zremesher of the structure of the mesh and give a better result.
- This function is great for reducing poly for easier manipulation for modelling.
- This used in conjuction with Zmodeler can have good results as Zremesher can detect edges well.
Zremesher at face value seems quite basic but i highly recommend researching further Michael Pavlovich has a great video tutorial on this.
3. Decimation Master
Decimation Master is probably one of the easiest of the tools to use but one of the least obvious in Zbrush.
It is a fully automated process and it gives you a fairly consistent result every time, not destroying the shape of your model. Its biggest drawback is it triangulates and gives you very messy topology.
Example of How to Use
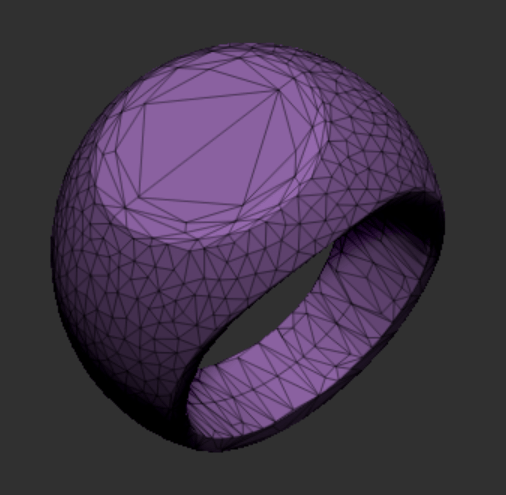
In this example we will use our 40k poly ring.
Decimation master can be found in the Zplugin menu below.
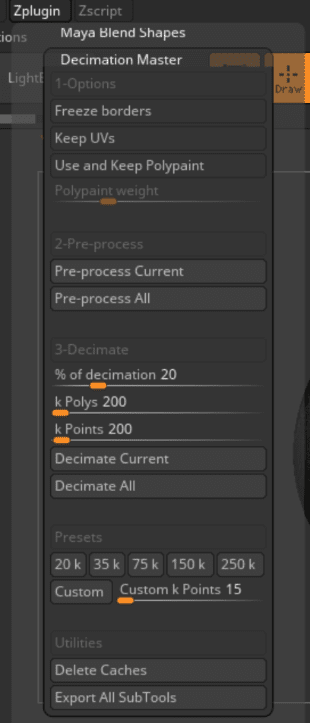
Step 1: First need to hit the pre-process button. You use current if you only wish to pre-process the current tool or all for all tools.
Step 2: choose your target poly count in this example I am going to use custom and set it to 1k.
Step 3: Hit the Decimate button once again current for current tool or all for all tools.
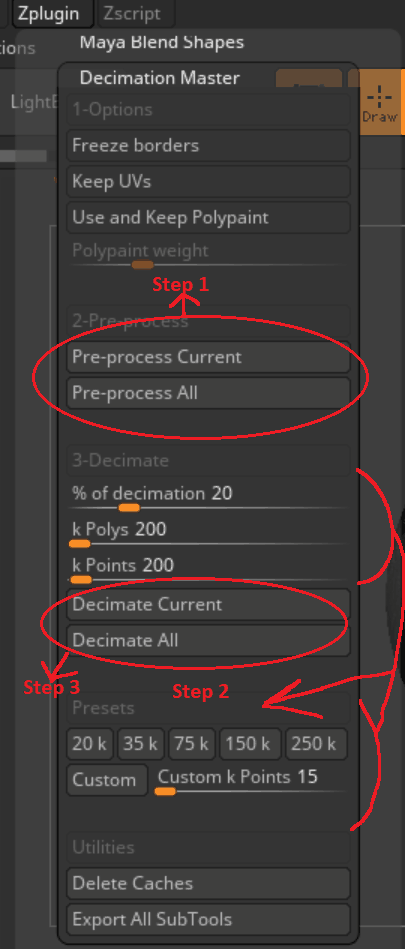
Your final model should look something like the below. As you can see it is fully triangulated but it keeps its shape very well and the model is now only 1k polys.
Pros
- 100% automated retopology
- It keeps the shape of the model really well
- The Algorithm is fast quickly converting multi million poly models
- The way it can keep it shape can sometimes assist with not having to create a high poly version
Cons
- It triangulates your mesh
- You have no control of its topology output
- Final topology is very messy and not ideal for some pipelines
Best way to use this:
- If you are concepting and not concerned about having a final model this allows for very quick iterating. By converting you final sculpt to a more manageable poly count you can quickly texture and render the model.
- The other algorithms such as the one Zremesher uses can sometimes have difficulty with really high poly models. It can be easier to decimate first then use Zremesher.
4. Topology Brush
Out of the manual retopology tools the Topology Brush is by far the easiest to use, however it lacks in precision and does not work well with symmetry when you wish to weld both halves together.
You also cannot just create a single face so further rework might need to be done later to clean up unnecessary topology.
While you could technically fully retopologize with this brush it can be a bit troublesome to use.
Example of How to Use
Once again we will use our 40k poly ring
You can find the topology brush is the brush menu.
To use you simply draw intersecting lines until they make topology as per below.

You can remove any unwanted lines by holing alt and drawing over the unwanted topology. Once you are happy left click on one of the highlighted segments and it will create the topology.
You will have to separate out the created topology by splitting it from the current tool you can do this by simply splitting by mask once you are done.
one thing to note is the thickness of the topology is dictated by the brush size the smaller the brush is the closer it is to the original topology.
Pros
- Easy to use
- Quick to create topology
Cons
- Can be difficult to fully retopologize with
- Points do not weld in symmetry
- Creates a closed mesh not just a face. It can create unnecessary topology requiring rework.
Best way to use this
- Because points do not weld in symmetry if needed retopologize half the model then uses Mirror and Weld function.
- Use the Zmodeler brush to clean up any unnecessary created topology.
Danny Mac 3d has a great video on this 1 minute and strait to the point.
5. Zsphere Retopology
Unless you used this function of Zbrush before or seen it around there is a good chance you would not know it exist. Zsphere Retopology gives the most control out of all these options. It requires you to place every quad point by point to allow you to have your topology exactly how you want it. The only downside is this methd completely manual.
This method can be a little tricky to get the used to. Once you do and learn how to best map your topology it is by far the best way of retopologizing in Zbrush.
Example of How to Use
Once again we will use our ring 40k poly ring.
First thing you need to do is append a Zsphere subtool
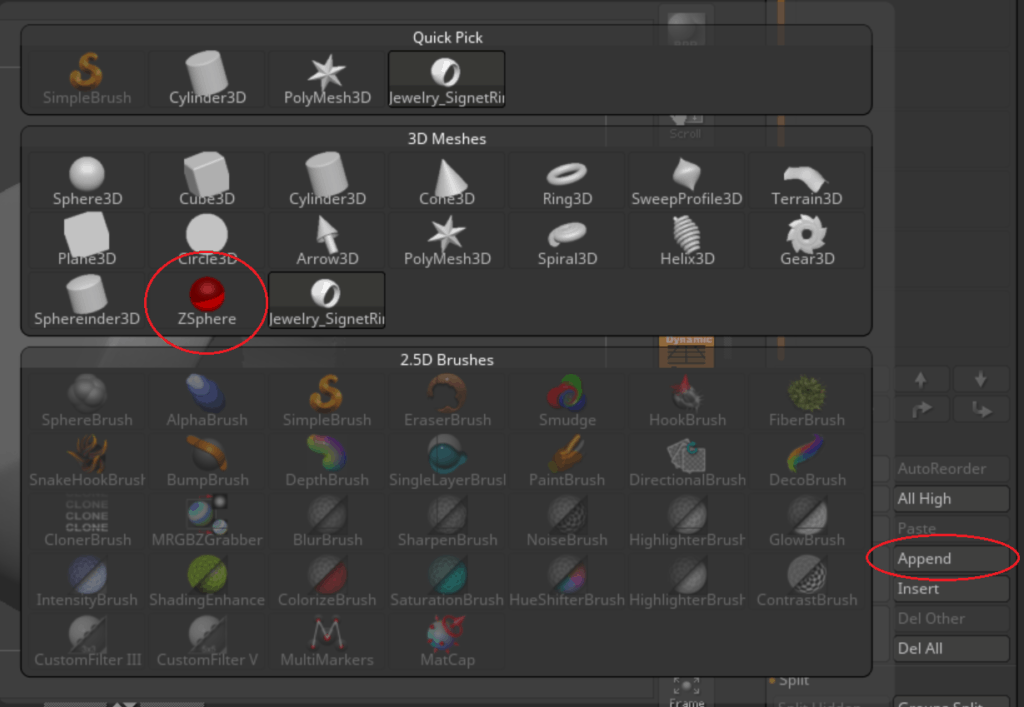
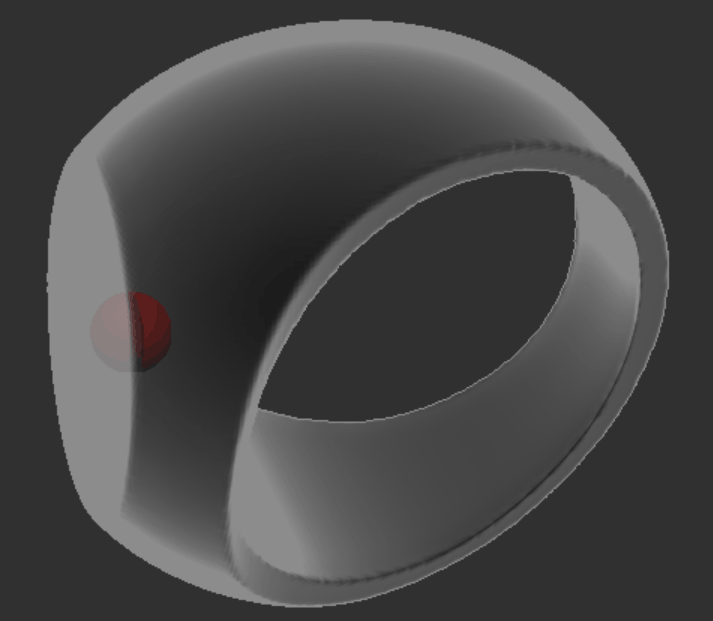
Once this is done resize the sphere so it is inside the topology you are retopologizing. Make sure it is fully inside the mesh so you don’t accidentally include it in the mesh. The scale of the sphere has no impact on this process.
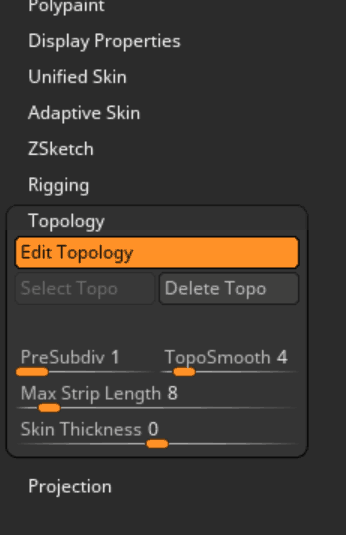
Now while still having the Zsphere Subtool selected scroll through your side bar until you find the Topology menu once there select Edit Topology and you are ready to go.
You should now be able to start plotting points on your visible subtools. When using you can plot each point by left clicking on the mesh and it will automatically connect the last point to your next one. To break this you then left click off your mesh and select a new point to start from. It can be a little tricky at first but stick with it
To move points select move like you would to move a mesh and simply drag your points.
To delete lines hold alt and choose a point. It will remove all topology connected to this point.
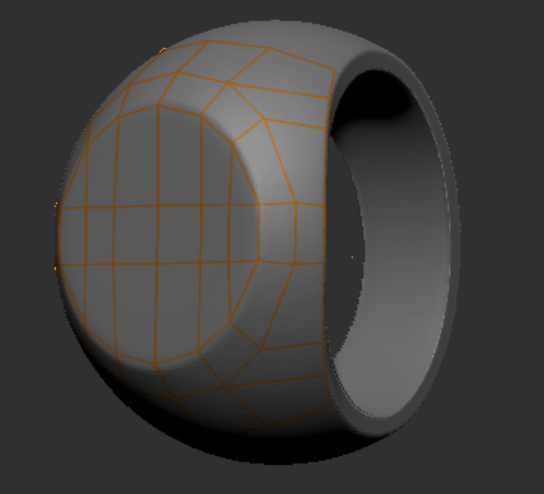
Symmetry works great with this brush for instance on this ring I can turn on X & Z symmetry and only have to model a quarter of the ring.
Once you have finished you will have a wire frame similar to the below.
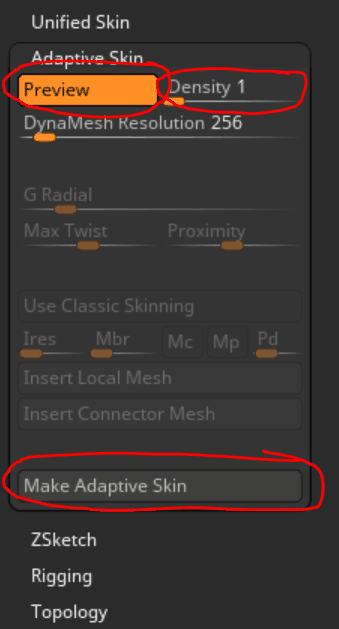
Now you can display what the new ring mesh will look like. To do this go to the Adaptive Skin menu on the left. Turn density to 1 as you don’t want to subdivide your new mesh. You may also want to turn off the visibility of the original mesh so you can see the results of your new mesh.
Once this is done hit preview. If you are happy with the result hit Make Adaptive Skin and your done
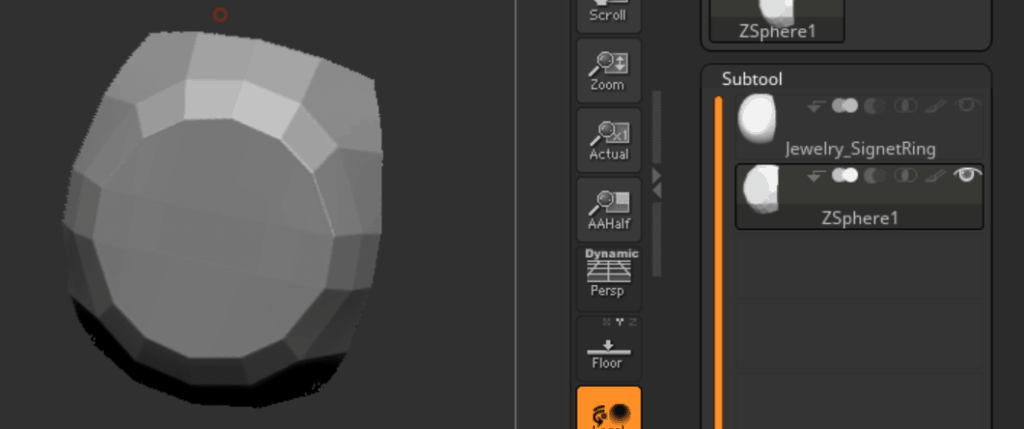
You will find your Zsphere has been replaced with the new created mesh in your subtools menu and should look something like the below.
Pros
- Gives you 100% control of how to place your topology
- Works with Symmetry so the manual process can go much quicker
- Only creates the faces so not touching up required
- Can retopologize any visible subtools turning many subtools into one
Cons
- This is a manual process so it can be tedious
- It can be difficult to setup and use
- Can be a little buggy at times recommend regular saving
- Has a little bit of a learning curve
Best way to use this
- Use this method to retopoligise groups of Subtools together similar to Dynamesh but with more control.
- Working in symmetry where it is sensible can greatly increase the workflow
- Before committing to a final mesh duplicate the Zshpere so you can always change later if needed.
If you are looking for a great video tutorial I strongly recommend Michael Pavlovich tutorial on this.
Hopefully now you have some understanding of the power of Zbrush and you can streamline your process without having to got to several programs.