When first learning Zbrush it is very easy to become overwhelmed. The number of brushes made available to you is astonishing. With this wide array of brushes it can be very easy to get distracted by which brush to use and focus less on the art itself.
Out of the hundred plus brushes there are only a few I would recommend to regularly use. From my research and experience the usage of these brushes vary depending on if you are Organic or Hard Surface Modelling. As such I have put together the below table of my recommendations.
| Brush | Organic | Hard Surface |
| Clay Buildup Brush | Yes | No |
| Dam Standard Brush | Yes | Yes |
| Move Brush | Yes | No |
| Inflate Brush | Yes | No |
| Snake Hook Brush | Yes | No |
| IMM Brushes | Yes | Yes |
| Smooth Brush | Yes | No |
| Trim Brushes | No | Yes |
| Clip Brushes | No | Yes |
| H Polish Brush | No | Yes |
| Pinch Brush | Yes | Yes |
| ZModeler Brush | Yes | Yes |
In this article we will discuss the purpose of these brushes and how you can implement them into your workflow.
Clay Buildup Brush
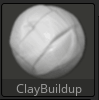
Clay Buildup Brush is the main brush for a lot of artists particularly for organic modelling. The way it sculpts the model is subtle enough not to make abrupt changes. In the sculpting process its ability to build off the previous stoke allows you to quickly create forms and detail that does not look out of place in the overall model.
It is really hard to explain but if you can get the hang of this brush I guarantee you it will be one of the main ones you use. This is usually my default choice when I looking to do any Organic modelling.
Dam Standard Brush

The Dam Standard Brush is really good for creating detail. It creates pinched lines or subtle sharper edges. It’s great for wrinkles in a face or subtle creases that brushes like the Clay Buildup brushes cannot. This brush is a favourite amongst artist and is commonly used.
I would primarily use this brush for organic modelling however it does have its purpose in hard surface modelling as well.
This brush mixed with the Clay Buildup Brush would allow you to make almost any shape you could need in organic modelling.
Move Brush

The Move Brush is an obvious one as it is quite a versatile tool. It is good for extruding extra geometry or making those changes to your end result for things that just don’t quite look right.
For example you modelled someone’s ear you have modelled the creases and it looks great, however the way the ear is extruding off the person’s head isn’t quite right. This is where the Move Brush comes in handy.
Once again due it is less precise nature I would primarily use this brush for organic modelling with limited use in Hard Surface modelling.
Inflate Brush

The inflate Brush does exactly what you would expect. it inflates certain aspects of your model giving it more volume.
I’ve found this brush really useful when it comes adjusting the proportions of limbs.
For example you have a hand but the fingers you have modelled are just too skinny in relation to the hand. I would then go in and inflate the fingers to give them more volume.
This is once again great for Organic modelling but not so much for Hard Surface modelling.
Snake Hook Brush

Historically I would not recommend the Snake Hook brush as it was limited by the amount of topology available giving average results requiring you to constantly retopologize. With the introduction of Scultris which generates topology as you sculpt making the Snake Hook brush very useful.
With Sculptris activated the Snake hook brush can pull additional geometry out of the surface as the name suggests similar to a snake. Thanks to Sculptris this no longer creates weird artefacts where topology density is too low.
This is great for quickly creating extra geometry to further sculpt. It can also be used as an alternative to the move brush as it allows you to move geometry with the addition of extra topology to support it.
I would personally use the brush primarily for Organic modelling due to its lack of precision.
IMM Brushes

There are various types of Insert Multi-Mesh (IMM) Brushes with libraries you can download from other users. These allow you to quickly add details to models without actually having to sculpt them yourself.
These brushes can help you quickly add detail to a model or do what is referred to as kit bashing where you can almost exclusively use them to create your model.
They are great because it allows you to quickly iterate to create models and add precise small details.
Using the example of screws you may need to add in hundreds to your model. You wouldn’t want to sculpt them one by one and even if you did there would be no consistency between screws.
IMM brushes really are a time saver and I commonly use them in Hard Surface and Organic modelling. It is definitely worth building up a library of them. A great resource for quality IMM brushes is from the Flipped Normal Market place the have a growing library of curated IMM brushes
Smooth

This brush is an obvious one and because it is tied to the Shift button you will find yourself using it quite often. The trick with this brush is how often you use it and at what resolution. As a beginner you will find yourself relying on this brush too much so I would recommend using it sparingly.
The smooth brush is great for Organic modelling and can also be used in Hard Surface modelling.
Trim Brushes

The Trim Brushes come in multiple forms including Circle, Rectangle, Lasso and Curve. These Brushes are great for making cuts in your geometry helping you very quickly make the shape of your model.
The way these brushes work is it cuts the model where you choose and creates new topology in its place so you arnt left with a hole in your mesh. The only downside to this brush is it does not work in symmetry. The best way around this is to Mirror and Weld the final result to restore your symmetry.
These brushes are great for Hard Surface modelling due to their precision and the final clean flat cut that they produce.
Clip Brushes

The Clip Brushes once again come in a set including Circle, Curve and Rectangle. These brushes function almost identical as the trim brushes in that it cuts the model based on your selection.
There are two main difference with these brushes. Firstly it does not delete topology like the Trim Brushes do. It shifts the topology to make the cut. This can sometimes lead to artefacts so be careful and check your final cut.
The second big difference is this brush works in symmetry so there is not need to mirror and weld afterwards.
In order to decide if you should use trim or clip I recommend just using the both and see what works best for you in the given situation.
Once again these brushes are great for Hard Surface modelling due to their precision and final smooth result.
H Polish Brush

The H Polish brush is great for flattening surfaces. The way it works is it uses the surrounding geometry to dictate how to flatten the mesh.
This brush is great for creating hard looking surfaces and removing the organic shapes of your model.
As you may have guessed this is great for Hard Surface Modelling and some people use this almost exclusively for Hard Surface modelling in Zbrush.
Pinch Brush
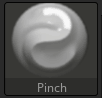
The Pinch Brush draws geometry on different angles together creating a hard corner or a crease in your model. Its great for defining hard corners or even just accentuating creases in models further.
A great use for this I have found is for creases in clothing you can make the initial creates using the Dam Standard Brush and the you can pinch the crease in in various parts to give the crease in the clothing a varied look.
This brush is great for Hard Surface and Organic modelling.
ZModeler Brush
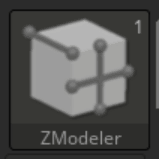
The ZModeler Brush isn’t so much a brush as it is a tool to be able to box model in Zbrush. It just happens to be accessible through the brush menu. The best thing about this brush is the options you have available for the box modelling process.
To use you simply pick a face, edge or point and press space bar and it gives you a list of everything you can do to the mesh. The options here in my opinion are better than programs such as blender as allows you a lot more ways to quickly box model using poly groups and the flow of the topology.
It is difficult to get the hang of if you have used programs such as Blender but I assure you once you get the hang of it you wont look back.
The ZModeler Brush is by far one of my favourite brushes in Zbrush and in my opinion one of the most under appreciated. As you may have guessed it’s great for Hard Surface modelling, but I’ve used it for Organic as well using it to create the initial shape and then sculpting on top of it.
Conclusion
As I am aware my explanation of these brushes are hard to explain and best demonstrated. Please check out my video on YouTube covering these brushes.
These brushes are the brushes I personally use most, but this may differ from person to person. I highly recommend however if you are new to Zbrush to just keep it simple. There are a lot of options however it doesn’t mean you have to use them all. Try a few and you will quickly find your favourites.
Good luck and have fun!!